<p>After the huge success of my previous Photoshop Tutorial for perfume commercial poster, I received so many requests asking to make more tutorials in this nature,…</p>
After the huge success of my previous Photoshop Tutorial for perfume commercial poster, I received so many requests asking to make more tutorials in this nature, so it took a while but finally I had a muse and I came up with a nice idea for a modern, not realistic, perfume advert, you see something like this in girl’s glamorous magazines, but this is my original and hopefully successful work. Here is your final result, and in order to achieve it, you will need the following materials:
Step 1
Let’s get started, open a new canvas, of any desired size. We didn’t want to create a huge canvas so we used 700×600 pixels. It also depends if you are going to use this image as a print later or just for playing around and using on the web. If you do intend to print it, make sure CMYC is set to the right properties. So, please the face of the girl in the middle of your canvas…
Step 2
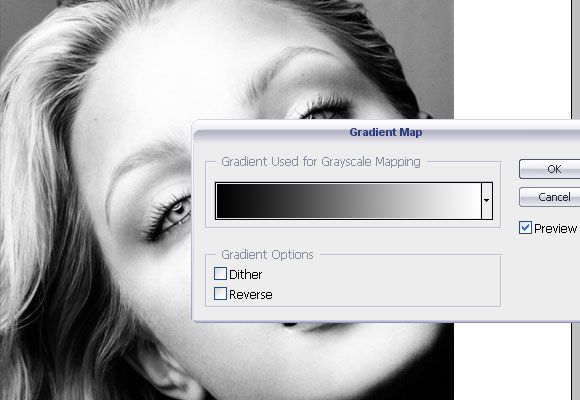
Duplicate the layer. Select the layer that is above and go to Gradient Map, by pressing Image >> Adjustments >> Gradient Map. Use gradient from black (#000000) to white (#ffffff), from left to right with NO reverse, just the way you see on the image below.
Step 3
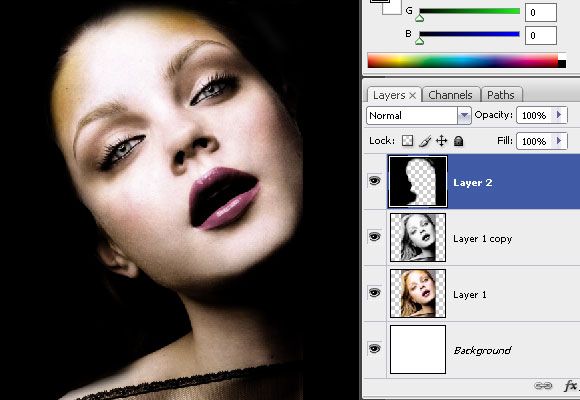
While the upper layer is still selected, set the blending option to Multiply. This will give your image a nice darkish touch, while preserving all the hues, gradients of colors and tones — you will get a very artistic and interesting result that will instantly look like a professional photography.
Step 4
Create a new layer by pressing Shft + Ctrl + N.
Select a brush with soft edge and set the foreground color to black and carefully cover all the area beside face and neck with the black background color. We are using the soft brush here because we don’t want to have any sharp edges, we want the dark background to blend in nicely with the shadows that we see on girl’s face.
Step 5
Time to play a bit with shapes. Use any twirly shape you wish, we used free ones (sorry they are so old that I have no idea anymore where did they come from). Once selected, and using the white color as foreground, apply them in all 4 sides of the photo…
…so that you will have a nice Victoria style frame all around.
Don’t worry if it doesn’t look too smooth — it’s not supposed to be! Just give it a funky-glamorous look, the way you see on most French adverts, commercials and packs.
Step 6
Now take the flower (link is at the beginning of the tutorial), and crop the flower so that you will be able to easily extract it from the background and apply without having any pixelated sides. Since cropping is a pretty much basic Photoshop technique we will not demonstrate here how to crop, hopping you will read about it in one of our basic tutorials.Step 7
Once cropped properly, apply the layer with flowers unto the composition you are creating. The idea is that one of the petals is located IN the lady’s month; now before you go ahead and assume this is something rude — we will have a point for this one later on, just be patient and continue reading.
Step 8
Select the flowers layer, and using the Burn Tool in your Photoshop, go over the flowering adding a little accent and depth — on the sides, edges and inside the flower. The burn tool will darken the areas you are working with, just be sure to use a Soft Brush of at least 100px and do not overdo this effect. This is something hardly visible and unseen, yet it adds depth and makes our image less shallow.
Step 9
Now, in our attempt to make the flowers layer organically blended and less shallow, we are going to add a shadow. Select the flowers layer by pressing Ctrl and selecting the layer from layers panel. Create a new layer and place it underneath the flowers layer. Fill the selection with black color.
Step 10
Press Ctrl + T to transform the selection of the shadow layer, and after right-click — use the “Skew” mode. Pull the edges of the bottom selection a little bit towards the sides but be careful not to overdo this effect — most Photoshop beginners tend to think that when following a tutorial — the more is the better, that is not quite always right.
Step 11
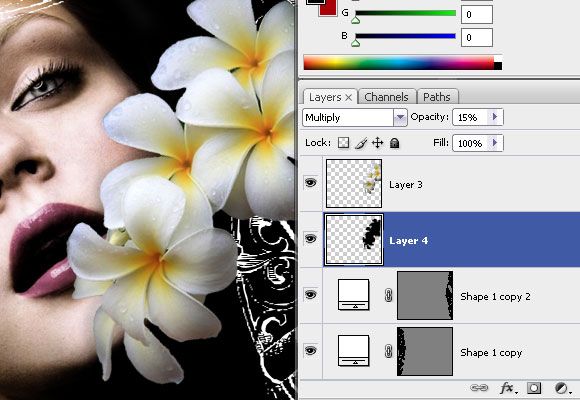
After you have transformed the shadow a little, apply a little Blur (Filter >> Blur >> Gausian Blur 3-4px) and set the opacity to Multiply and 15%.
Step 12
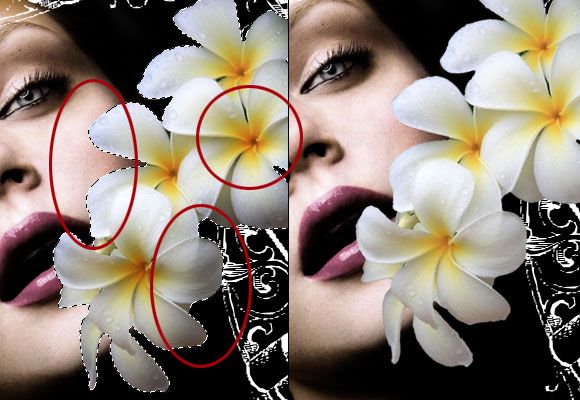
Now, select the flower layer, and while it’s selected, using the Eraser Tool with soft edge and 100px radius, erase half of the petal that it near lady’s mouth, so that it will create the illusion us fading smoke. Please see the illustration for better demonstration..
Step 13
Now, download and install the smoke brushes (at the beginning of the post) and use any one of them that you find particularly appealing. using the white color as your foreground color in photoshop, we are going to create a new layer and apply the brush on the screen. In this Photoshop tutorial we will not explain how to install the brushes, hoping you already know how to do that..
Step 14
The brushes with smoke are already semi transperant, so you probably won’t need to set them to any opacity, other than Normal. If, however, in your partucular image settings you see that the smoke pretty much covers the girl’s face — try and reduce the opacity to about 80% or lower.
Once applied, using a big Eraser Tool’s soft brush of at least 150 px, remove smoke from girl’s cheeks — the way that it will create an illusion of smoke coming out from her mouth and not just chaotically spread covering her face. Therefore your smoke should also be erased from the chin, if there are any traces of it.
Step 15
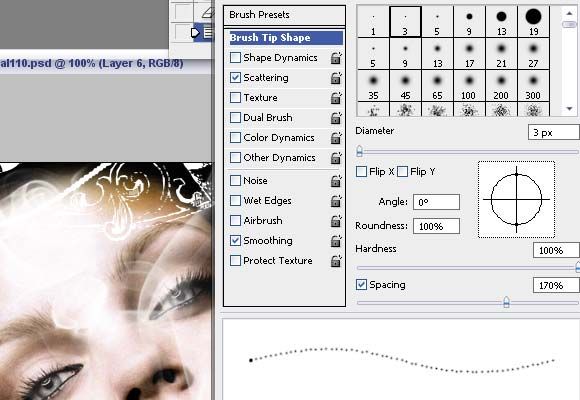
Now we are going to work with the Brush tool. Set it to a small 3 pixels size, but using a Soft Edge. Please copy the settings for “Scattering” from the illustration below. The idea is to create a trail of dots, like pearls string, using your free hand and no pen tool.
Once these settings has been applied, just draw curvy lines from the lady’s mouth — outwards.make sure that these curves in lines complement the smoke .
Step 16
After having applied that, go to Layer Styles while the dots layer is still selected and apply a bit of outer glow using white color with 65% opacity and 6 pixel size.
Step 17
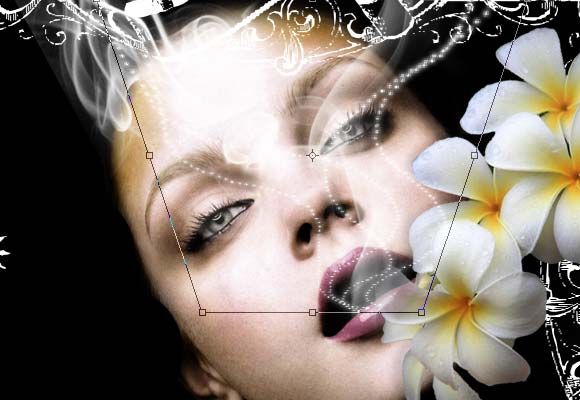
Once you have done with the glow, press Ctrl + T to transform the layer and using the “Perspective” mode (right click and select Perspective) and pull the upper corners a little bit outwards to create an illusion of a certain dimension.
Step 18
Next step is adding splashes of water. we have black background here, therefore we also picked water splashes with black background. Although, theoretically speaking, you can pick a water splash with any background and then crop and using various settings just apply it unto the composition — in our case it is tremendously easier to use back background and save the hassle of unneeded work. Apply the splashes at the bottom of our composition, duplicate the layer a several time so that you will be able to cover the whole bottom area with water splashes and drops.
Set the opacity of the water splashes on ALL the layers you have duplicated to “Lighten“.
Step 20
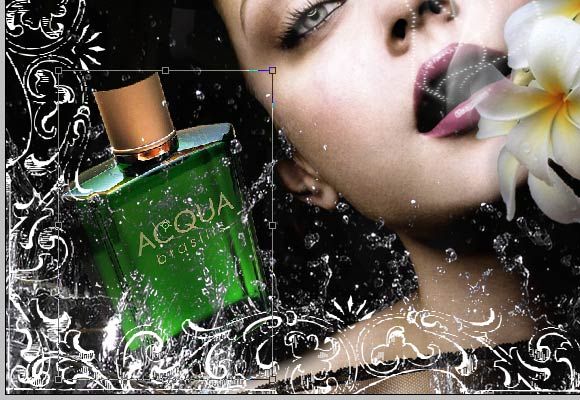
Take any photo of a perfume bottle, crop it and paste into the dark and empty corner of the composition. Rotate it using the Ctrl + T functions so that the bottle will look like it’s popping out of the splashes.
Step 21
One of our last steps would be to choose a good looking horizon photo. Here you can really take anything you like since it won’t be the leitmotif of our composition. Apply it anywhere between the fragrance bottle layer and lady’s face. Using an Eraser Tool with 65px soft edge brush, start erasing the sky layer from over the face and neck of our female model. When you finished, set the opacity of the layer wit horizon to Lighten or Multiply, depending on the initial darkness of your chosen image.
As a final touch, i also added dots around the fragrance , yet without a glow.
Done! That’s it, here is the final result. i hope you enjoyed the tutorial and please don’t forget to subscribe to our RSS Feed or Email Notifications to ensure you never miss any of our new tutorials.
Lorelei has been an online entrepreneur, marketer and writer since 2006. Her biggest passion is WordPress, which is why she switched to being a full-time blogger 20 years ago and hasn’t looked back since. With so many years of experience behind her, she is an expert in copywriting, SEO, marketing and business strategies.

 Step 3
While the upper layer is still selected, set the blending option to Multiply. This will give your image a nice darkish touch, while preserving all the hues, gradients of colors and tones — you will get a very artistic and interesting result that will instantly look like a professional photography.
Step 4
Create a new layer by pressing Shft + Ctrl + N.
Select a brush with soft edge and set the foreground color to black and carefully cover all the area beside face and neck with the black background color. We are using the soft brush here because we don’t want to have any sharp edges, we want the dark background to blend in nicely with the shadows that we see on girl’s face.
Step 3
While the upper layer is still selected, set the blending option to Multiply. This will give your image a nice darkish touch, while preserving all the hues, gradients of colors and tones — you will get a very artistic and interesting result that will instantly look like a professional photography.
Step 4
Create a new layer by pressing Shft + Ctrl + N.
Select a brush with soft edge and set the foreground color to black and carefully cover all the area beside face and neck with the black background color. We are using the soft brush here because we don’t want to have any sharp edges, we want the dark background to blend in nicely with the shadows that we see on girl’s face.
 Step 5
Time to play a bit with shapes. Use any twirly shape you wish, we used free ones (sorry they are so old that I have no idea anymore where did they come from). Once selected, and using the white color as foreground, apply them in all 4 sides of the photo…
…so that you will have a nice Victoria style frame all around.
Don’t worry if it doesn’t look too smooth — it’s not supposed to be! Just give it a funky-glamorous look, the way you see on most French adverts, commercials and packs.
Step 6
Now take the flower (link is at the beginning of the tutorial), and crop the flower so that you will be able to easily extract it from the background and apply without having any pixelated sides. Since cropping is a pretty much basic Photoshop technique we will not demonstrate here how to crop, hopping you will read about it in one of our basic tutorials.
Step 7
Once cropped properly, apply the layer with flowers unto the composition you are creating. The idea is that one of the petals is located IN the lady’s month; now before you go ahead and assume this is something rude — we will have a point for this one later on, just be patient and continue reading.
Step 8
Select the flowers layer, and using the Burn Tool in your Photoshop, go over the flowering adding a little accent and depth — on the sides, edges and inside the flower. The burn tool will darken the areas you are working with, just be sure to use a Soft Brush of at least 100px and do not overdo this effect. This is something hardly visible and unseen, yet it adds depth and makes our image less shallow.
Step 5
Time to play a bit with shapes. Use any twirly shape you wish, we used free ones (sorry they are so old that I have no idea anymore where did they come from). Once selected, and using the white color as foreground, apply them in all 4 sides of the photo…
…so that you will have a nice Victoria style frame all around.
Don’t worry if it doesn’t look too smooth — it’s not supposed to be! Just give it a funky-glamorous look, the way you see on most French adverts, commercials and packs.
Step 6
Now take the flower (link is at the beginning of the tutorial), and crop the flower so that you will be able to easily extract it from the background and apply without having any pixelated sides. Since cropping is a pretty much basic Photoshop technique we will not demonstrate here how to crop, hopping you will read about it in one of our basic tutorials.
Step 7
Once cropped properly, apply the layer with flowers unto the composition you are creating. The idea is that one of the petals is located IN the lady’s month; now before you go ahead and assume this is something rude — we will have a point for this one later on, just be patient and continue reading.
Step 8
Select the flowers layer, and using the Burn Tool in your Photoshop, go over the flowering adding a little accent and depth — on the sides, edges and inside the flower. The burn tool will darken the areas you are working with, just be sure to use a Soft Brush of at least 100px and do not overdo this effect. This is something hardly visible and unseen, yet it adds depth and makes our image less shallow.
 Step 9
Now, in our attempt to make the flowers layer organically blended and less shallow, we are going to add a shadow. Select the flowers layer by pressing Ctrl and selecting the layer from layers panel. Create a new layer and place it underneath the flowers layer. Fill the selection with black color.
Step 10
Press Ctrl + T to transform the selection of the shadow layer, and after right-click — use the “Skew” mode. Pull the edges of the bottom selection a little bit towards the sides but be careful not to overdo this effect — most Photoshop beginners tend to think that when following a tutorial — the more is the better, that is not quite always right.
Step 11
After you have transformed the shadow a little, apply a little Blur (Filter >> Blur >> Gausian Blur 3-4px) and set the opacity to Multiply and 15%.
Step 9
Now, in our attempt to make the flowers layer organically blended and less shallow, we are going to add a shadow. Select the flowers layer by pressing Ctrl and selecting the layer from layers panel. Create a new layer and place it underneath the flowers layer. Fill the selection with black color.
Step 10
Press Ctrl + T to transform the selection of the shadow layer, and after right-click — use the “Skew” mode. Pull the edges of the bottom selection a little bit towards the sides but be careful not to overdo this effect — most Photoshop beginners tend to think that when following a tutorial — the more is the better, that is not quite always right.
Step 11
After you have transformed the shadow a little, apply a little Blur (Filter >> Blur >> Gausian Blur 3-4px) and set the opacity to Multiply and 15%.
 Step 12
Now, select the flower layer, and while it’s selected, using the Eraser Tool with soft edge and 100px radius, erase half of the petal that it near lady’s mouth, so that it will create the illusion us fading smoke. Please see the illustration for better demonstration..
Step 13
Now, download and install the smoke brushes (at the beginning of the post) and use any one of them that you find particularly appealing. using the white color as your foreground color in photoshop, we are going to create a new layer and apply the brush on the screen. In this Photoshop tutorial we will not explain how to install the brushes, hoping you already know how to do that..
Step 14
The brushes with smoke are already semi transperant, so you probably won’t need to set them to any opacity, other than Normal. If, however, in your partucular image settings you see that the smoke pretty much covers the girl’s face — try and reduce the opacity to about 80% or lower.
Once applied, using a big Eraser Tool’s soft brush of at least 150 px, remove smoke from girl’s cheeks — the way that it will create an illusion of smoke coming out from her mouth and not just chaotically spread covering her face. Therefore your smoke should also be erased from the chin, if there are any traces of it.
Step 15
Now we are going to work with the Brush tool. Set it to a small 3 pixels size, but using a Soft Edge. Please copy the settings for “Scattering” from the illustration below. The idea is to create a trail of dots, like pearls string, using your free hand and no pen tool.
Step 12
Now, select the flower layer, and while it’s selected, using the Eraser Tool with soft edge and 100px radius, erase half of the petal that it near lady’s mouth, so that it will create the illusion us fading smoke. Please see the illustration for better demonstration..
Step 13
Now, download and install the smoke brushes (at the beginning of the post) and use any one of them that you find particularly appealing. using the white color as your foreground color in photoshop, we are going to create a new layer and apply the brush on the screen. In this Photoshop tutorial we will not explain how to install the brushes, hoping you already know how to do that..
Step 14
The brushes with smoke are already semi transperant, so you probably won’t need to set them to any opacity, other than Normal. If, however, in your partucular image settings you see that the smoke pretty much covers the girl’s face — try and reduce the opacity to about 80% or lower.
Once applied, using a big Eraser Tool’s soft brush of at least 150 px, remove smoke from girl’s cheeks — the way that it will create an illusion of smoke coming out from her mouth and not just chaotically spread covering her face. Therefore your smoke should also be erased from the chin, if there are any traces of it.
Step 15
Now we are going to work with the Brush tool. Set it to a small 3 pixels size, but using a Soft Edge. Please copy the settings for “Scattering” from the illustration below. The idea is to create a trail of dots, like pearls string, using your free hand and no pen tool.
 Once these settings has been applied, just draw curvy lines from the lady’s mouth — outwards.make sure that these curves in lines complement the smoke .
Step 16
After having applied that, go to Layer Styles while the dots layer is still selected and apply a bit of outer glow using white color with 65% opacity and 6 pixel size.
Step 17
Once you have done with the glow, press Ctrl + T to transform the layer and using the “Perspective” mode (right click and select Perspective) and pull the upper corners a little bit outwards to create an illusion of a certain dimension.
Once these settings has been applied, just draw curvy lines from the lady’s mouth — outwards.make sure that these curves in lines complement the smoke .
Step 16
After having applied that, go to Layer Styles while the dots layer is still selected and apply a bit of outer glow using white color with 65% opacity and 6 pixel size.
Step 17
Once you have done with the glow, press Ctrl + T to transform the layer and using the “Perspective” mode (right click and select Perspective) and pull the upper corners a little bit outwards to create an illusion of a certain dimension.
 Step 18
Next step is adding splashes of water. we have black background here, therefore we also picked water splashes with black background. Although, theoretically speaking, you can pick a water splash with any background and then crop and using various settings just apply it unto the composition — in our case it is tremendously easier to use back background and save the hassle of unneeded work. Apply the splashes at the bottom of our composition, duplicate the layer a several time so that you will be able to cover the whole bottom area with water splashes and drops.
Set the opacity of the water splashes on ALL the layers you have duplicated to “Lighten“.
Step 20
Take any photo of a perfume bottle, crop it and paste into the dark and empty corner of the composition. Rotate it using the Ctrl + T functions so that the bottle will look like it’s popping out of the splashes.
Step 18
Next step is adding splashes of water. we have black background here, therefore we also picked water splashes with black background. Although, theoretically speaking, you can pick a water splash with any background and then crop and using various settings just apply it unto the composition — in our case it is tremendously easier to use back background and save the hassle of unneeded work. Apply the splashes at the bottom of our composition, duplicate the layer a several time so that you will be able to cover the whole bottom area with water splashes and drops.
Set the opacity of the water splashes on ALL the layers you have duplicated to “Lighten“.
Step 20
Take any photo of a perfume bottle, crop it and paste into the dark and empty corner of the composition. Rotate it using the Ctrl + T functions so that the bottle will look like it’s popping out of the splashes.
 Step 21
One of our last steps would be to choose a good looking horizon photo. Here you can really take anything you like since it won’t be the leitmotif of our composition. Apply it anywhere between the fragrance bottle layer and lady’s face. Using an Eraser Tool with 65px soft edge brush, start erasing the sky layer from over the face and neck of our female model. When you finished, set the opacity of the layer wit horizon to Lighten or Multiply, depending on the initial darkness of your chosen image.
As a final touch, i also added dots around the fragrance , yet without a glow.
Done! That’s it, here is the final result. i hope you enjoyed the tutorial and please don’t forget to subscribe to our RSS Feed or Email Notifications to ensure you never miss any of our new tutorials.
Step 21
One of our last steps would be to choose a good looking horizon photo. Here you can really take anything you like since it won’t be the leitmotif of our composition. Apply it anywhere between the fragrance bottle layer and lady’s face. Using an Eraser Tool with 65px soft edge brush, start erasing the sky layer from over the face and neck of our female model. When you finished, set the opacity of the layer wit horizon to Lighten or Multiply, depending on the initial darkness of your chosen image.
As a final touch, i also added dots around the fragrance , yet without a glow.
Done! That’s it, here is the final result. i hope you enjoyed the tutorial and please don’t forget to subscribe to our RSS Feed or Email Notifications to ensure you never miss any of our new tutorials.

